



Receipt Book Artwork Guide: Bleed, Numbering & Spot Colours
← View all Printing Support Guides
Image Magic Receipt Book Artwork Guide
Prepare Your NCR Receipt Book File Correctly Before Printing
Receipt books require more than the correct page size. Bleed, binding clearance, perforation, copy labels, serial numbering and spot-colour separations must all be positioned correctly before the artwork is approved.
Quick Artwork Requirements
The selected Image Magic product template overrides general artwork measurements shown on other support pages.
Important Bleed Calculation Correction
The existing example uses a finished size of 210 × 297 mm and an artwork size of 214 × 301 mm. This calculation means 2 mm bleed on each edge.
297 + 2 + 2 = 301 mm
Do not describe this as 4 mm on every edge. Four millimetres on every edge would produce an artwork size of 218 × 305 mm.
Template first: Some general Image Magic products use another bleed measurement. For receipt books, always use the dimensions shown in the exact downloadable receipt-book template selected for your order.
Finished Size, Bleed and Safe Areas
Finished size
The final receipt or form size after trimming. Your product size selection refers to this finished dimension.
Bleed area
Extra artwork outside the trim line. Background colours and images must extend fully through this area.
Safe area
The area where text, logos, table lines, totals, signatures and other important information should remain.
Binding area
The top or left section used for gluing or binding. Avoid placing important content in this area.
Perforation area
The tear-off position between the detachable form and the bound stub. Keep text and numbering clear of the perforation.
Hole-punch area
Where punching is selected, keep logos, text, borders and table information away from the marked punch position.
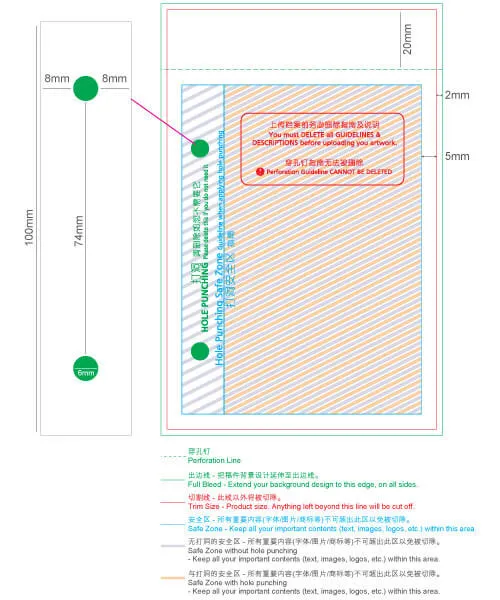
If a template marks the safe area as 7 mm from the outside artwork edge and uses 2 mm bleed, that is equivalent to 5 mm inside the trim line. For critical text, numbers, logos and signatures, keeping approximately 10 mm inside the trim line is safer, especially near binding and perforation.
How to Prepare the Artwork File
Remove or hide non-printing template notes, measurements and guide boxes before exporting. Keep only the artwork elements intended to print.
Serial Numbering Setup
Sequential numbering is added during production. Your artwork normally needs only a dummy number to show the required position, size and alignment.
Use dummy numbering
Place the dummy number supplied in the product template at the exact location where the final serial number should appear.
Provide the starting number
Enter the required starting sequence in the order textbox. Under the current production rule, the starting number should end in 1.
Keep the digit length consistent
Choose the required format, such as 0001 or 00001. Leading zeroes should remain consistent throughout the sequence.
Current numbering colour
Standard numbering is printed in red. Contact the team before ordering when another arrangement is required.
Example: when the starting number is 0001 and 500 numbered sets are ordered, the final number will be 0500.
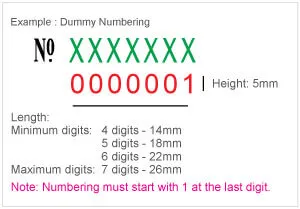
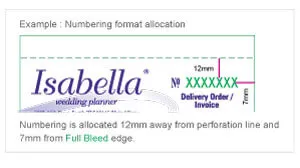
Do not manually create hundreds of different numbered artwork pages. Submit one artwork with a dummy numbering position and provide the actual starting sequence during ordering.
Copy Change for NCR Duplicate or Triplicate Sets
Copy change identifies the purpose of each NCR sheet, for example CUSTOMER COPY, OFFICE COPY or ACCOUNT COPY.
| Copy-change item | Current artwork requirement |
|---|---|
| Typeface | Arial |
| Letter style | ALL CAPS |
| Artwork colour | Red |
| Available size | 8 pt, 10 pt or 12 pt |
| Wording | Provide the exact label required for each NCR copy |
Copy-change text should not be confused with serial numbering. Copy change identifies each NCR sheet, while serial numbering changes sequentially from one receipt set to the next.
Spot-Colour Artwork Setup
The following colour values are Image Magic production separation references. They identify which artwork elements belong to each selected spot colour. They do not necessarily represent the final printed ink colour.
| Printing selection | Artwork separation | What to do during ordering |
|---|---|---|
| One spot colour — front | K:100 | Select the required final spot colour in the product options |
| Two spot colours — front |
First colour:
K:100 Second colour: M:100 | Select both required final spot colours during ordering |
| One spot colour — back | K:60 | Use only when the selected product template specifies this setup |
| Full-colour artwork | CMYK | Select the applicable full-colour product option |
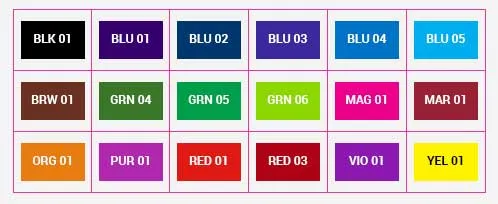
Do not use RGB colours, uncontrolled gradients, transparencies or additional colour channels in spot-colour artwork unless approved by the production team.
Binding, Perforation and Hole Punching
- Confirm whether the receipt book is bound on the top or left.
- Keep important content away from the glued binding edge and perforation.
- Do not place numbering directly on a perforation, fold or punch position.
- Hole punching is currently offered on the left side for eligible products with the applicable dimension of 100 mm or more.
- Hole punching should only be included when the option is available and selected during ordering.
- Follow the exact punch and perforation positions shown in the template.
Do not mirror or rotate the template without checking the binding side. A left-bound template and top-bound template use different safe areas and page orientations.
Common Receipt Book Artwork Mistakes
Final Artwork Checklist
Frequently Asked Questions
Is the receipt-book bleed 4 mm on every side?
Not according to the existing 210 × 297 mm to 214 × 301 mm example. That example represents 2 mm on each edge. Always follow the exact downloadable product template.
Do I need to prepare every serial number in the artwork?
No. Place one dummy number to show the position and enter the actual starting number during ordering.
Can my numbering start from 0000?
The current standard rule requires the starting number to end in 1, such as 0001 or 00501. Contact Image Magic before ordering when a different sequence is required.
Why do I use K100 and M100 for spot colours?
They are separation references used to distinguish the first and second spot-colour artwork elements. The final ink colours are selected in the order options.
What is copy change?
Copy change is the different label printed on each NCR sheet, such as Customer Copy, Office Copy or Account Copy.
Can the receipt book be printed on both sides?
Yes, when a suitable two-sided option is selected. Supply the front and back pages in the correct template orientation.
Can hole punching be placed at the top?
The current standard option described in this guide is left-side punching for eligible sizes. Confirm availability in the selected product options before preparing the artwork.
Need Help Checking Your Receipt Book Artwork?
Send us your receipt-book size, binding side, duplicate or triplicate requirement, starting number, printing colours and artwork file. Our team can check the setup before production.